
Intro – Apna Suit, Apna Design
Kya kabhi socha hai, jab tum ek handmade suit pehenti ho — ekdum perfect fit, apni pasand ke colour aur neckline ke saath — uski feel store-bought outfit se kahin zyada classy hoti hai?
Par jab koi beginner silai shuru karta hai, sabse pehla doubt aata hai — cutting aur stitching kaise karein?
Iss article mein hum complete step-by-step process cover karenge: measurement, cutting, stitching, finishing aur pro tailoring tips — bilkul easy Hinglish mein.
Agar tum beginner bhi ho, to ye guide tumhe ek professional jaise suit banana sikhayegi ✂️✨
Step 1: Measurements Lena – Foundation of Perfect Fit
Sabse important step hai accurate measurements lena.
Galat measurement = galat fitting.
Essential Measurements:
| Body Part | Description | Pro Tip |
|---|---|---|
| Bust (Chest) | Fullest part of chest measure karo | Tape flat rakhna, tight nahi |
| Waist (Kamar) | Natural waistline pe measure karo | Fit suit chahiye to 1 inch ease add karo |
| Hip (Nithamba) | Fullest part around hip | Sides equal rakho |
| Shoulder Width | Dono kandhon ke beech ka distance | 14–16 inch average |
| Armhole Depth | Shoulder se underarm tak | Hand thoda relax rakho |
| Sleeve Length | Shoulder se wrist ya elbow tak | Thoda extra rakho for folding |
| Suit Length | Shoulder se niche tak jahan tak chahiye | Daily wear 38–42 inch normal |
| Neck Depth (Front/Back) | Style ke hisaab se | Round/V decide pehle |
| Bottom Length | Waist se ankle tak | Salwar 38–40″, pant 36–38″ |
Pro tip: sab measurements likh lo ek chhoti diary me. Ek baar pattern ready ho gaya, baad me repeat karna easy hota hai.
Step 2: Fabric Preparation – Kapde ka Game Strong
Yahan log galti karte hain — kapda bina wash kiye cut kar lete hain.
Lekin kapda har baar wash ke baad thoda shrink karta hai.
✅ Do These Before Cutting:
- Kapda pre-wash karo (especially cotton).
- Iron karke crease-free banao.
- Fold kapda right sides together (inside out).
- Check grainline direction — hamesha lengthwise straight honi chahiye.
Recommended Fabrics for Straight-Cut Suit:
| Fabric Type | Best For | Notes |
|---|---|---|
| Cotton | Daily wear | Easy cutting, breathable |
| Rayon | Casual wear | Flowy aur soft |
| Georgette | Festive suits | Light fall, thoda slippery |
| Linen | Summer wear | Crisp & elegant |
| Silk Blend | Party wear | Shine aur grace |
Step 3: Pattern Drafting – Suit Ka Blueprint
Yeh step real magic hai — kapda tabhi sahi banta hai jab draft correct ho.
✏️ Front & Back Piece Draft:
- Ek large brown paper ya tracing sheet le lo.
- Top edge par shoulder line mark karo.
- Neck width (3″) aur depth (3″ back, 6″ front) draw karo.
- Shoulder slope banate hue 1 inch down le jao.
- Bust line aur waist line mark karo (shoulder se measure karke).
- Armhole curve draw karo (gentle curve, not deep).
- Side seams ke liye waist aur hip points connect karo.
💡 Princess cut nahi chahiye? Simple straight draft hi perfect hai beginners ke liye.
Sleeve Pattern:
- Fabric fold karo, upper edge pe cap height mark karo (usually 4″–5″).
- Center se dono sides me armhole width divide karke curve draw karo.
- Length mark karo aur straight line down le jao.
- Hem pe 1 inch fold allowance add karo.
Neck Facing / Piping Pattern:
Small rectangular piece alag cut karo for neckline finishing.
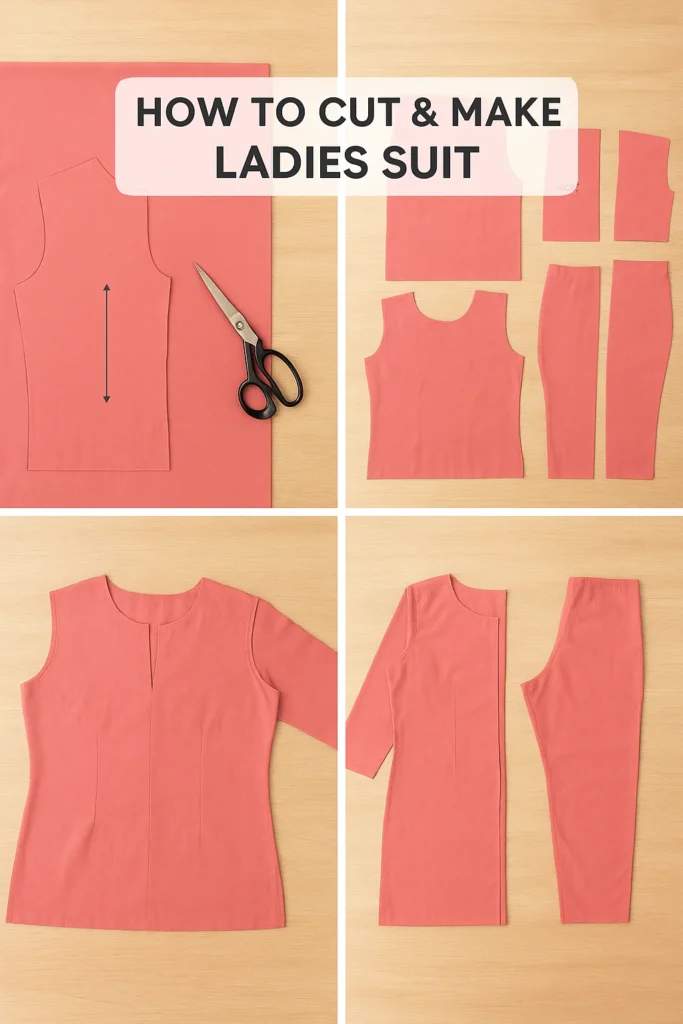
Step 4: Cutting Process – Precision is Key
Ab cutting start hoti hai, sabse satisfying moment
Step-by-Step:
- Fabric Fold:
Kapda ko fold karo (right sides together). Fold edge par front pattern align karo. - Place Pattern:
Pattern paper rakho, pins se fix karo. - Trace with Chalk:
Chalk ya fabric marker se outline draw karo — seam allowance add karna na bhoolna!- Neck, shoulder, armhole = ½ inch
- Side seams = 1 inch
- Hem = 1½ inch
- Cut Slowly:
Sharp scissor se smooth cut karo — fabric stretch mat hone do. - Mark Matching Points:
Shoulder, armhole aur side notches mark karo taaki stitching time confuse na ho.
🧠 Bonus Tip: agar kapda patterned hai (jaise check ya stripe), ensure karo dono sides ka print match kare!
Step 5: Stitching Process – Suit Ko Shape Dena
Ab fun part — machine chalu karo, aur apna design reality mein badlo!
Step-by-Step Stitching Guide:
1️⃣ Shoulder Seams Join Karna
Front aur back pieces ko right sides facing rakhkar shoulder lines align karo.
- Straight stitch do ½ inch seam allowance pe.
- Seam open karke iron karo — neat aur flat lagega.
- Agar fabric fray karta hai, overlock ya zig-zag stitch se edges finish karo.
2️⃣ Neckline Finishing
Neck facing ya piping dono options hote hain:
- Facing method: Facing ko neck ke upar rakhkar stitch karo, turn karke press karo.
- Bias piping: Bias strip lagakar topstitch karo — decorative bhi lagta hai.
Pressing is must — bina ironing ke facing kabhi flat nahi baithti.
3️⃣ Attach Sleeves
- Body ke armhole aur sleeve ke center notch align karo.
- Thoda ease do upper curve pe (don’t stretch).
- Pin karlo aur straight stitch do.
- Overlock edges for clean finish.
4️⃣ Side Seams Close Karna
- Sleeve ke niche se start karke straight neeche bottom tak stitch karo.
- Don’t forget to check alignment of underarm & waist.
- Press seams flat after stitching.
5️⃣ Bottom Hem Finish
Kurti ke niche 1½ inch fold karke press karo.
Double fold se clean edge milega.
Straight topstitch lagao — neat and classy.
6️⃣ Sleeve Hem
Sleeve end pe bhi 1 inch fold karke topstitch do.
Optional: lace, gota, or small border for designer look.
Step 6: Bottom Stitching (Salwar / Pant) – Full Detailed Process
Ab chalo suit ka bottom stitch karte hain — chahe tum simple straight pant, salwar, ya churidar banana chahti ho, process similar hi rehta hai, bas shape alag hoti hai. Yahaan hum pant-style suit bottom explain kar rahe hain — modern suits ke saath perfect match ✨
1️⃣ Fabric Fold & Alignment
Fabric ko double layer mein fold karo, ensuring dono edges bilkul straight aur aligned ho. Fold edge tumhare pant ke outer side ke liye use hoga. Fabric grainline straight honi chahiye taaki pant twist na kare. Folding theek na ho to cutting ke baad shape bigad jaata hai, so accuracy zaroori hai.
2️⃣ Marking the Pattern / Measurements
Ab apne measurements ke according marking karo — waist, hip, crotch depth, thigh aur total length. Crotch depth usually 10–11 inches hoti hai, lekin body type ke hisaab se vary karti hai. Marking karte waqt inch tape seedha rakho aur chalk se clean outline banao taaki cutting time par koi confusion na ho.
3️⃣ Cutting the Panels
Marking ke baad fabric ko scissors se carefully cut karo. Front aur back panel slightly different hote hain — back panel mein crotch area thoda extra rakha jaata hai for comfort. Cutting ke baad pieces ko alag rakh lo aur matching notches (front/back) chalk se mark kar lo, stitching time easy identification ke liye.
4️⃣ Inner Leg Seam Join Karna
Front aur back panel ko right sides together rakhkar inner leg seams (andar wali side) join karo. Straight stitch do, ½ inch seam allowance pe. Overlock ya zig-zag stitch se edge finish karo taaki threads na nikle. Dono sides ke inner seams same length ki honi chahiye — warna pant twist karegi.
5️⃣ Crotch Area Stitching
Ab dono stitched panels ko align karo aur crotch line join karo. Ye area sabse stress-prone hota hai, to double stitch ya reinforcement zarur do. Stitch ke baad seam open karke press karo. Ye ensure karega ki pant perfectly shaped aur comfortable ho — bilkul ready-made jaise fitting mile.
6️⃣ Side Seam Join Karna
Ab pant ke outer side seams close karo. Right sides together rakhkar waist se niche ankle tak straight stitch lagao. Press karke seams open karo for neat look. Side seam se fitting decide hoti hai, to pehle ek trial stitch karke check kar lo — zarurat pade to thoda adjust kar sakte ho.
7️⃣ Waistband Preparation
Ab waistband banana hai — ek alag strip (3–4 inch wide) cut karo ya upper edge fold karke belt bana lo. Isme elastic, nada ya hook-lace insert kar sakte ho. Belt area pe double fold karo taaki strong rahe. Stitch neat aur tight ho, warna waistband loose ho jaayega.
8️⃣ Elastic / Nara Insert Karna
Waistband ke ek chhoti si side opening chhodo aur wahan se safety pin ke help se elastic ya nara pass karo. Elastic insert hone ke baad ends ko overlap karke stitch karo. Opening close karo. Elastic equal distribute ho iske liye waistband ko thoda kheench kar press zaroor karo.
9️⃣ Bottom Hem Finishing
Pant ke bottom edges pe 1½ inch fold karo, press karo aur double fold karke topstitch lagao. Churidar ya salwar ho to folds thoda narrow rakho. Hem neat aur even lagna chahiye — ye final polish deta hai. Designer touch chahiye to lace, dori, ya gota border add kar sakte ho.
🔟 Final Ironing & Fitting Check
Sab seams press karne ke baad pant pehna kar check karo. Waistband comfortable hai ya nahi, inseam proper hai ya nahi — sab verify karo. Minor adjustments karo if needed. Phir final overall steam press do. Ye step fabric ko settle karta hai aur ek professional, wrinkle-free finish deta hai
💡 Bonus Hack: Agar pant ke niche thoda flare chahiye to side seam ke lower 5 inch area me ½ inch widen kar do — instantly boot-cut look milta hai
Step 7: Pressing & Final Finishing – Suit Ko Professional Look Dena
Pressing ek underrated art hai — par asli difference wahi laata hai. Properly pressed suit hi “ready-made look” deta hai. Jab silai puri ho jaaye, tab suit ka final shape aur polish ironing se hi nikalta hai. Let’s go step-by-step
1️⃣ Pressing After Every Seam
Har seam stitch karne ke baad turant press karo. Ye fabric ke folds ko set karta hai aur silai flat lagti hai. Shoulder, side, aur dart seams ke baad steam press do. Jab tak har joint press nahi hota, suit ka overall shape dull lagega — pressing se silhouette define hota hai.
2️⃣ Use Steam Iron Wisely
Steam iron se wrinkles instantly remove hote hain, par temperature ka dhyaan rakhna zaroori hai. Cotton ke liye medium-high heat, silk ke liye low steam, aur synthetic fabric ke liye warm setting use karo. Zyada heat se fabric shine ya burn ho sakta hai, so hamesha patch test karo.
3️⃣ Use Pressing Cloth for Sensitive Areas
Neckline, sleeves armhole, aur curves press karte waqt pressing cloth (muslin ya thin cotton kapda) rakho. Ye fabric ko shine ya marks se bachata hai. Especially dark colors mein, direct iron se “glossy patches” aa jaate hain — pressing cloth se finish subtle aur rich dikhti hai.
4️⃣ Dart & Curve Pressing Techniques
Darts aur princess seams ko curve direction mein press karo — andar ke folds outward direction me gently shape do. Ye step body-contoured shape nikalta hai. Agar tailor’s ham ya small towel roll use karo to curved areas (like bust or waist) naturally shape retain karte hain.
5️⃣ Pressing the Neckline
Neckline area sabse visible hota hai, so special attention do. Facing ya piping lagane ke baad neck ko andar fold karke lightly steam karo. Iron ko continuously move karte raho — ek jagah par zyada time mat rakho. Final press se neckline crisp, smooth aur perfectly curved dikhegi.
6️⃣ Sleeves & Armhole Pressing
Sleeves attach karne ke baad, joint seam ko gently press karo taaki puffiness na aaye. Armhole area curved hota hai, so flat iron na rakho — edge se press karo, circular motion mein. Agar lining di ho, to steam se press karna better hota hai instead of direct contact.
7️⃣ Final Full Suit Pressing
Jab poora suit stitch ho jaaye — kurta, bottom aur dupatta sab — tab ek baar overall steam pressing do. Kurta ke front pe zyada steam aur back pe gentle press. Pant ke crease line ko straight karo. Ye poore outfit ko “brand new showroom finish” deta hai
8️⃣ Adding Optional Embellishments
Final touch ke liye detailing add kar sakte ho —
• Lace on sleeves or kurta hem for festive touch.
• Button loops on neckline for elegant vibe.
• Piping along side slits for contrast look.
Ye chhoti cheezein hi overall design elevate karti hain aur handmade piece ko designer feel deti hain.
9️⃣ Final Inspection & Loose Threads Check
Silai ke baad har seam ko inspect karo. Kahi loose threads, skipped stitches, ya uneven hems to nahi? Threads trim karo aur edges check karo. Ye final quality check hota hai jisse suit professionally finished lagta hai. Ek minute ka kaam, par huge difference!
🔟 Final Folding & Storage Tip
Suit press hone ke baad turant fold mat karo. Usse pehle thoda thanda hone do taaki crease set ho jaaye. Fir neatly fold karo ya hanger pe latka do. Agar ready-to-deliver hai to plastic cover mat lagao — usse fabric sweat karta hai. Cotton cloth wrapping best hai!
Pro Finishing Hack:
Thoda starch spray use karo cotton suits ke liye — suit ekdum crisp aur fresh lagta hai, jaise boutique se naya nikal ke aaya ho
Step 8: Common Mistakes & How to Fix – “Galtiyaan Sabse Hoti Hain, Par Seekhna Hero Ki Pehchaan Hai”
Tailoring mein chhoti si galti bhi poora look bigaad sakti hai. Par tension nahi bro, yahaan har common blunder ka solution ready hai
1️⃣ Measurement Mein Chhoti Ghalti = Bada Problem
Log often measuring tape ko loose ya tight pakad lete hain. Result? Suit ya to chipak jaata hai ya lappa jaisa latakta hai.
Fix: Always measure while standing straight, breathing normal. ½ inch ease hamesha add karo — comfort aur fit dono milega.
2️⃣ Fabric Cutting Galat Grainline Pe
Fabric ko wrong direction me fold kar doge to shape hil jaata hai, pant twist karega ya kurta ka fall ajeeb lagega.
Fix: Cutting se pehle grainline (weave direction) check karo — threads straight hone chahiye. Always mark grain arrow before cutting.
3️⃣ Neckline Pe Stitch Pull Ho Jana
Neckline press karte ya stitch karte waqt fabric stretch kar dete hain, aur result hota hai “wavy neck.”
Fix: Stay stitch lagao neckline par before joining facing. Ye fabric ko stretch hone se bachata hai.
4️⃣ Armhole Tight Ya Loose
Armhole galat measure karne se ya wrong sleeve curve se fitting off lagti hai.
Fix: Always compare sleeve cap with armhole circumference before attaching. ½ inch ease sleeve me add karo — smooth movement ke liye.
5️⃣ Uneven Hemline
Kurta ka front aur back length mismatch ho jaata hai.
Fix: Stitching ke baad suit ko flat surface pe spread karo, measure both sides and trim before hemming. Always press hem before final stitch.
6️⃣ Elastic Waistband Twist Ho Jana
Pant ya salwar ke waistband me elastic ghusate waqt twist ho jaata hai aur uncomfortable lagta hai.
Fix: Elastic insert karte waqt safety pin ke sath line mark kar lo aur both ends ko overlap karke double stitch do.
7️⃣ Thread Tension Galat on Machine
Machine tension galat hone se stitch loose ya bunchy dikhta hai.
Fix: Practice scrap fabric pe karo — jab stitch dono sides equal lage tab tension perfect hota hai. Har fabric ke liye tension thoda adjust karna padta hai.
8️⃣ Pressing Without Checking Heat Setting
Ek second zyada heat aur silk ya georgette jal gaya 🥲
Fix: Hamesha test press karo kapde ke corner pe. Delicate fabric ke liye pressing cloth use karo. Aur synthetic fabrics par dry iron low heat pe rakho.
9️⃣ Skipping Trial Fitting
Direct stitch karke final fitting check karte ho to regret fix karna mushkil ho jaata hai.
Fix: Temporary stitch (basting) karo aur trial pehen kar check karo. Fir final stitching do. Pro tailors never skip this step!
🔟 Ignoring Seams Finishing
Seams open chhod doge to threads nikalne lagte hain aur suit ke andar messy dikhega.
Fix: Overlock ya zig-zag finish zaroor do. Ye simple step suit ki life double kar deta hai.
💬 Remember: Har galti ek nayi masterclass hoti hai. Jo seekh gaya, wo tailor nahi — artist hai
Step 9: Expert Tailoring Hacks (Jo Top Blogs Nahi Batate 😏)
1. Interfacing Magic:
Collar, neckline, ya placket pe fusible interfacing use karna professional look deta hai. Market wale ready-made suits bhi yehi trick use karte hain to keep shape sharp.
2. Secret Marking Chalk:
Tailor chalk ki jagah soap edge ya heat-erasable pen try karo — mark clean aur safe rehta hai, aur press karte hi erase ho jaata hai.
3. Stay Stitch Before Cutting:
Delicate fabrics jaise chiffon ya georgette ke edges fray hote hain. Cutting ke turant baad ek stay stitch (½ inch seam pe) daal do — ye fabric ko control mein rakhta hai.
4. Perfect Slit Alignment:
Side slit ke dono panels ko match karte waqt pin + press dono karlo. Ye ensure karta hai ke dono slits ek hi height pe ho — warna finishing asymmetrical lagegi.
5. Double Stitch Trick:
Suit ke shoulders aur side seams pe ek extra stitch line daal do (¼ inch distance par). Ye durability badhata hai aur shape maintain karta hai even after washing.
6. Thread Color Harmony:
Always test karo under light — kabhi-kabhi daylight aur indoor light mein thread alag shade lagta hai. Slightly darker thread usually suit ko zyada defined look deta hai.
7. Boutique Finish Neckline:
Neckline ke andar se bias binding lagao matching ya contrast fabric mein — ye ek hidden designer touch deta hai jo expensive suits jaise lagta hai.
8. Labeling Hack (For Future Use):
Apne handmade suits ke andar ek small tag ya paper label chipka do — likho fabric type + measurement. Agli baar same fitting chahiye toh direct reference mil jaayega.
Step 10: Final Wrap-Up – “Silai Se Style Tak”
Dekha na bhai? Ek simple kapde ka tukda — jab pyaar, patience, aur precision se kaata jaata hai — toh wo ek suit ban jaata hai, ek expression of personality.
Ladies suit banana sirf tailoring nahi, ek art hai — jahan har stitch ek kahani likhta hai aur har press ek finishing touch deta hai.
Yad rakho:
- Measurement perfect lo.
- Cutting steady rakho.
- Stitching clean ho.
- Aur finishing… royal.
Ab chahe tu beginner ho ya intermediate, ye guide ke baad tu confidently apna suit bana sakta hai — perfect fitting, boutique finish, aur zero confusion ke saath.
Practice se hi perfection aata hai, toh har suit ke saath apna craft polish karte ja.
Aur haan, agla blog mein hum “Anarkali Suit Cutting & Stitching” full detail mein karenge — ekdum designer-level explanation ke saath. 👗
Final Words
Silai ek skill nahi, ek legacy hai — jo maa ke haath se shuru hoti hai aur modern tailoring tables tak pahuchti hai.
Chahe machine purani ho ya design latest, agar dil se stitch karoge toh har suit masterpiece lagega.
Tu ready hai, bhai. Ab needle thread karo, fabric fold karo, aur duniya ko dikha do —
“Handmade suits bhi runway ke liye ready ho sakte hain.”
FAQs: “Cutting aur Stitching Ke Confusions Clear Karo”
Hamesha accurate body measurement lo. Bust, waist, hip, aur shoulder — ye 4 points exact hone chahiye. Galat measurement sab efforts waste kar deta hai.
Cotton ya poly-cotton best hote hain. Ye fabric stretch nahi karte, cutting easy hoti hai, aur press bhi ache se hota hai.
Neck facing dobara open karo aur thoda dart add karo underarm ke paas. Isse gap close ho jaata hai without ruining the shape.
Fabric grain galat cut hua hoga. Hamesha fabric ke selvage ko fold ke saath align karke hi cut karo.
Polyester thread best hai — strong, shiny, aur machine-friendly. Cotton thread sirf hand embroidery ya light fabric ke liye.
Neckline pe interfacing lagao aur bias binding se finish karo. Press karte waqt curve pe press cloth use karo — shine nahi aayegi aur shape maintain rahega.
Light cotton mein nahi, par chiffon, georgette, ya net fabric mein lining must hai. Ye suit ko structure aur comfort dono deti hai.
Har seam ke baad press karo, extra threads trim karo, aur neckline + sleeves pe piping ya lace lagao. Ye small touches designer look create karte hain.
Haan, salwar zyada flare hoti hai aur gusset (tukdi) add hota hai. Pant straight cut hoti hai, measurement tight aur clean rakho.